Table Widgetを使って、文字などをテーブル状に配置する方法を紹介します。
「Column Widget」や「Row Widget」を使っても同じことができますが、複数行・複数列のときは、Tableを使うのが便利で簡単です。
「Table Widget」では「表を罫線で囲む」、「行の高さ・列幅の指定」、「列を幅いっぱいに伸ばす」、「セル内の揃え方向」などの指定ができます。
Udemy 割引セール中! ![]() 4/25まで対象コースが1,500円〜
4/25まで対象コースが1,500円〜
「Table」のサンプルコード
import 'package:flutter/material.dart';
void main() => runApp(MyApp());
class MyApp extends StatelessWidget {
const MyApp({Key key}) : super(key: key);
@override
Widget build(BuildContext context) {
return MaterialApp(
title: "Table Demo",
theme: ThemeData.dark(),
home: MyHomePage(),
);
}
}
class MyHomePage extends StatefulWidget {
const MyHomePage({Key key}) : super(key: key);
@override
_MyHomePageState createState() => _MyHomePageState();
}
class _MyHomePageState extends State<MyHomePage> {
@override
Widget build(BuildContext context) {
return DefaultTextStyle(
textAlign: TextAlign.center,
style: TextStyle(fontSize: 40.0,color: Colors.white,
),
child: Center(
child: Table(
border: TableBorder.all(color: Colors.white),
columnWidths: const <int, TableColumnWidth>{
0: IntrinsicColumnWidth(),
1: FlexColumnWidth(1.0),
2: FixedColumnWidth(100.0),
},
defaultVerticalAlignment: TableCellVerticalAlignment.top,
children: [
TableRow(children: [
Text("1"),
Text("2"),
Text("3"),
]),
TableRow(children: [
Container(
child: const Text("4"),
margin: EdgeInsets.all(10.0),
width: 50.0,
height: 100.0,
color: Colors.lightGreen,
),
Container(
child: const Text("5"),
color: Colors.amberAccent,
),
TableCell(
verticalAlignment: TableCellVerticalAlignment.bottom,
child: Container(
child: const Text("6"),
margin: EdgeInsets.only(bottom: 10.0),
height: 60,
color: Colors.orange,
)
)
]),
TableRow(
decoration: const BoxDecoration(color: Colors.grey),
children: [
Center(
child: Container(
child: Text("7", style: TextStyle(fontSize: 20.0),),
width: 30,
height: 100,
color: Colors.pinkAccent,
),
),
Container(
child: Text("8\n8"),
),
TableCell(
verticalAlignment: TableCellVerticalAlignment.middle,
child: Container(
child: Text("9", style: TextStyle(fontSize: 20.0),),
height: 50,
color: Colors.blue,
),
),
]
),
],
),
),
);
}
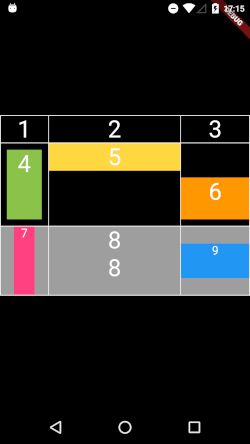
}実行結果
Table自体を「Center Widget」に入れて、表全体を中央に表示しています。
左右に余白をつけていないので、両端の罫線が見えませんが、表全体が罫線で囲まれています。
サンプルコードの解説
27行目 表の初期値設定
    return DefaultTextStyle(
      textAlign: TextAlign.center,
      style: TextStyle(fontSize: 40.0,color: Colors.white,
      ),
      child: Center(
        child: Table(
          border: TableBorder.all(color: Colors.white),
          columnWidths: const <int, TableColumnWidth>{
            0: IntrinsicColumnWidth(),
            1: FlexColumnWidth(1.0),
            2: FixedColumnWidth(100.0),
          },
まず、表で表示する文字の初期値を「DefaultTextStyle」で設定します。
ここでは、文字揃え、文字サイズ、文字色をしています。
この「DefaultTextStyle」の中に「Table」を作ります。
33行目 表の罫線
        child: Table(
          border: TableBorder.all(color: Colors.white),
          columnWidths: const <int, TableColumnWidth>{
            0: IntrinsicColumnWidth(),
            1: FlexColumnWidth(1.0),
            2: FixedColumnWidth(100.0),
「border:」で全体の罫線の色を指定しています。何も書かなければ罫線は引かれません。
34行目 列の幅
列の幅は、「columnWidths:」を使ってMap型で設定をしています。
列の左から、0から始まるインデックスをつけ、その後に列幅をどうするのか設定していきます。
1列目の列幅は、セル内の子Widgetで指定した幅にします
          columnWidths: const <int, TableColumnWidth>{
            0: IntrinsicColumnWidth(),
            1: FlexColumnWidth(1.0),
            2: FixedColumnWidth(100.0),
2列目は、表全体が、親Widgetの幅(デフォルトが1.0)に対して余ったぶんを吸収して伸ばします。
3列目は、固定幅で値を100.0としました。
39行目 縦方向の位置
縦方向の位置は、「defaultVerticalAlignment:」で上揃えにしました。
          defaultVerticalAlignment: TableCellVerticalAlignment.top,
          children: [
            TableRow(children: [
              Text("1"),
              Text("2"),
              Text("3"),
            ]),
41行目 行(表の1行目 1、2、3)
「TableRow」で行を作ります。
ここでは単純に「Text」で、1、2、3と並べました。
46行目 列幅の設定(表の2行目・1列目 4)
            TableRow(children: [
              Container(
                child: const Text("4"),
                margin: EdgeInsets.all(10.0),
                width: 50.0,
                height: 100.0,
                color: Colors.lightGreen,
              ),
              Container(
                child: const Text("5"),
                color: Colors.amberAccent,
              ),
表2行目の1列目は、「Container」の中でセルの中に上下左右の余白をとっています。
1列目の幅は、先に「IntrinsicColumnWidth()」としているので、「Container」の中で「列幅 width:」と「行の高さ height:」を指定しました。
58行目 セル内の揃え(表の2行目・3列目 6)
              TableCell(
                  verticalAlignment: TableCellVerticalAlignment.bottom,
                  child: Container(
                    child: const Text("6"),
                    margin: EdgeInsets.only(bottom: 10.0),
                    height: 60,
                    color: Colors.orange,
                  )
              )
セル内の揃え位置などを初期値とは違う値にしたいときは、「TableCell Widget」を使います。
「TableCellVerticalAlignment.bottom」で縦位置を下揃えにして、その中で「Container」を使っています。
69行目 セルの背景色(表の3行目 7、8、9)
            TableRow(
                decoration: const BoxDecoration(color: Colors.grey),
                children: [
                  Center(
                    child: Container(
                      child: Text("7", style: TextStyle(fontSize: 20.0),),
                      width: 30,
                      height: 100,
                      color: Colors.pinkAccent,
                    ),
                  ),
「TableRow」の「decoration:」を使って、セルの背景色をグレーにしています。
参考:「Flutter – widgets.dart」
Flutter公式サイトでは、画面上で直接コードを編集して実行結果を見ることができます。
Flutter公式 Flutter – widgets.dart – Table class
Udemy 割引セール中! ![]() 4/25まで対象コースが1,500円〜
4/25まで対象コースが1,500円〜